Thursday, July 17, 2014

Gluten Free Buttermilk Pizza Crust


This is our families favorite pizza crust recipe.  I have been supplementing buttermilk for most of the recipes that call for "milk" and find that it works better in gluten free baking.  I think the extra fat may help with  developing the dough.  Of course, I am going to recommend that you buy the best buttermilk you can find.  I get ours from a local dairy in a small glass bottle.  It is light yellow because the cows are grass fed.   Notice the pizza crust is tinged with a yellow hue--that is in part from the buttermilk and also using millet.  This flour is a light yellow.

Millet is a wonderful grain.  It has the best flavor and performs beyond expectation in my gluten free baked goods.  You will notice I use it all the time.  I find that it adds the right amount of flavor to trick my friends and family into thinking they are eating something "wheat-filled".  Let me know if you have had the same experience.

This pizza crust is not hard to make.  If you have not worked with gluten free bread doughs before then you are in a for a treat.  It is different but I have included some pictures below to help you bake your first pizza crust.  The dough needs to be wet so that it has enough water to work with the flours. It is a bit technical but if the dough is too dry then you get dry products.  We don't want that!


I make this dough on a pizza stone.  I find that the outer crust is crispy and the pizza crust is soft in the middle.  My husband said it reminded him of the boxed pizza crust you get at the store and make at home.  This is not a bad thing.  It is just a good example of what the texture will be like.  

This recipe makes one large pizza (12 inches) or you can make individual pizzas.  Just cut the parchment paper to the size that you need and spread the dough out.  The thicker you have it the thicker the crust will be.  I made sure mine was a little more than 1/4 inch thick and it swelled up to what you see in the picture.  You may need to play around with it to see which thickness you like.

I made this blueberry BBQ sauce and chicken pizza for my family.  The reason I chose to make this pizza with this sauce is because the sauce is wet.  I wanted to see if the crust would hold up.  I am quite pleased to say that it did.  The BBQ sauce recipe will be up soon--look for it!

Final thought:  buy a scale!  I am making more and more of my recipes by volume.  To guarantee that each recipe turns out the same each time I must cook this way.  It is so much easier to bake with a scale than with 5 different measuring cups.  I use one bowl, a scale and bam--it's done.  Really easy!

I will have the estimated cups listed next to the recipe for those that do not have a scale but, again, I am encouraging you to invest in this very useful kitchen tool.

This delicious Blueberry BBQ Chicken Pizza recipe will be out on Sunday--be sure to check back!


Gluten Free Buttermilk Pizza Crust


Makes one crust

160 grams (1 cup) white rice flour
76 grams (1/2 cup) millet flour
56 grams (1/2 cup) tapioca starch
20 grams (1/4 cup) potato starch
1 teaspoon guar gum
1 teaspoon salt
2 eggs
2 tablespoons extra virgin olive oil
133 grams (1/2 cup) buttermilk + a 2 teaspoons (if needed)
1 teaspoon vinegar

Preheat oven to 425 degrees.

1.  Combine the dry ingredients into a medium bowl.  Sift once.  Sifting helps to mix the ingredients and to find any clumps in the flours and starches.

2.  In a small bowl combine the wet ingredients.

3.  I use my KitchenAid stand mixer to mix the dough.  Add the dry and the wet to the stand mixer and attache the paddle tool.  Start on low and mix dough, once it is mixed, increase speed to medium for 5 minutes.  Dough should look stretchy--like a thick cake batter.

4.  This is best made on parchment paper.  If you don't have any, then get the pan that you will bake the crust on and spread with a light sprinkling of corn meal.  See picture below.  Pour dough into the middle of the paper or pan.


5.  Take a plastic spatula and spread dough to desired thickness and size.  You can also make individual sized pizzas.  See picture below.


6.  See picture to know how I spread mine.  This was the final product.


 7.  Bake just the crust for 8 minutes.  See picture at the top.  Add sauce, cheese and ingredients and bake for an additional 10-12 minutes.  Remove from oven.  The pizza should slide off of the parchment paper.  I remove the parchment paper so that the crust can sit directly on my pizza stone and dry up any sauce that may have ran over the sides.

8.  Slice and serve.  Store left overs in the refrigerator.


Written by Sherron Watson

Tuesday, July 15, 2014

Tomato Citrus Jam


I have been dying to make some tomato jam.  My family is a huge fan of tomatoes.  I found a recipe and experimented with the flavors a bit and decided that I really liked my version better.  

I added cinnamon, orange zest and orange pulp.  The orange added a unique citrus flavor profile.  I used the tomato jam as a condiment to our grilled cheese sandwiches.  The pictures show our favorite, open faced grilled cheese sandwiches.

I found the longer it sat in the refrigerator the more developed the jam became.  Although, it did not last that long because I could not stop eating it, maybe four or five days.


Tomato Citrus Jam
Makes roughly 1 cup of jam

1 1/2 pounds ripe Roma tomatoes, peeled and coarsely chopped (about 8)
1/2 cup of sugar
2 tablespoons fresh squeezed lime juice
1 teaspoon fresh grated ginger
1/2 orange, pulp and juice only
1 teaspoon orange zest
1 teaspoon ground cumin
1/4-1/2 teaspoon ground cinnamon
1/4 teaspoon ground cloves
1 teaspoon salt
1/2 teaspoon red pepper (optional)


1.  To remove the skin from the tomatoes, bring a pot of water to a boil.  Cut an X on the top of each tomato and add to boiling water.  After one minute, remove and let cool for a minute or two.   The skin should peel easily in your hands. Cut tomatoes into medium sized pieces.

2.  Add the tomatoes and remaining ingredients to a medium sauce pan.  Bring to a boil over medium heat.  Stirring often to prevent jam from burning.  Once jam has boiled for one minute, reduce heat to a simmer and let jam thicken.  Again, stir it every once in a while. The jam should take about an hour to reduce and thicken up.

3.  Remove from heat, taste and adjust seasonings.  Store in refrigerator.  Good for two weeks.


Written by Sherron Watson


Sunday, July 13, 2014

No Bake Caramel Apple Pie Cheesecake


The hot weather has finally arrived in Maryland and I am trying some new no bake desserts on my family. They love cheesecake and this is a recipe that I shared with Capital Style Magazine in May.  

This is one of those recipes that you can easily replace the apple pie filling for any pie filling or fruit filling your family would like.  The caramel sauce on top can also be left off or switched for something else.

I take these camping with us because I can make them at home and keep them in the cooler. They stack great in the bottom of our cooler.  I can use the jars to store leftovers in from dinner.   Its a fun dessert to surprise the kids with when they are tired and need an energy boost from hiking and playing.  

Using the jelly jars makes them a great individual sized dessert too.  You will find that I love to make dishes that can be individualized for my guest and friends. 


No Bake Caramel Apple Pie Cheesecake


Makes 4
Prep Time: 20 minutes

4-8oz jelly jars with lids

1-8oz package of cream cheese, softened
1/2 teaspoon vanilla extract
1/2 teaspoon lemon juice
1/2 cup of sugar
2 cups of whipped cream or dessert topping
1 cup crushed Graham Crackers (or use gluten free ginger snaps too)
2 Tablespoons butter, melted
1-21oz can of apple pie topping (use homemade as an option)
1 small jar Caramel Ice Cream topping (make caramel from scratch as an option)

1.  In a medium bowl combine cream cheese, vanilla, lemon juice and sugar.  Combine until sugar is no longer grainy. Add whipped cream to cream cheese mix and fold in gently.  Keep in refrigerator until ready to use.

2.  In a small bowl combine crushed graham crackers and butter.

3.  Divide the graham cracker mixture equally between the 4 jelly jars.  Use something with a flat surface to push down the crumbs to form a crust.

4.  Add a 1/4+ cup of cheesecake mixture to each jar leaving a small amount for a second layer.

5.  Add apple pie topping.  Leave enough room to add second layer of cheesecake filling and caramel sauce.

6.  Add second layer of cheesecake.

7.  Add caramel sauce.

8.  Refrigerate until ready to serve.


Written by Sherron Watson

Thursday, July 10, 2014

Gluten Free Steak Fingers with Gravy


I grew up eating chicken fried steak.  My grandfather was from Texas and this is one of those Texas dishes that we had once a week.  The other dish was SOS (s**t on the shingle).  I am not sure if that is a Texas dish but he thought it was.

I make these steak fingers instead of the whole steak for several reasons.  The primary reason is because I find that the breading stays on the fingers much better than the whole steak.  I don't really like it when the breading falls off.  I feel like I am constantly stabbing my food trying to get a bit of breading with a piece of meat.  I don't have time for such games.

The other reason I like using the fingers: my kids.  They like them and that is a bonus.  They have turned their noses up at the whole steak but the fingers make them happy.  The are kid friendly and kid approved.

The gravy may sound weird because it is made with coconut milk but honestly I love it.  I have several friends that are dairy free and I like to try and find ingredients they can use too.  You can always replace the coconut milk for regular milk in this recipe.

I would recommend frying them in lard or coconut oil.  These are two of my favorite choices when it comes to frying our food at home.

The only note I should make is that when you reheat them the next day they will lose that crispy bite. I have not tried warming them up in the stove.   This may make them crunchy again but I know that my kids are not going to take the time to do that and they are okay warming them up in the microwave.


Gluten Free Steak Fingers with Gravy
Makes 12-15 fingers, depends on how thick you cut them

4 medium size cube steaks, I used my hand as my guide (from my wrist to my middle finger)
Coconut oil for frying

Wet ingredients:

2 eggs
1 cup full fat coconut milk
1/4 cup water

Dry ingredients:

1 cup white rice flour
2 cups fine corn meal
2 teaspoons garlic powder
2 teaspoons onion powder
2 teaspoons salt
1/2 teaspoon paprika
1/2 teaspoon black pepper
(adjust the seasonings to your personal preferences.  Use less or more based on what your family likes)

Gravy
Remaining can of coconut milk


1.  Use a cast iron skillet if you have one.  If you don't then use a heavy duty skillet.  Add 2 tablespoons of coconut oil to the pan and heat oil.  Use the picture below to see how much oil I keep in the pan.  You will have to add more oil periodically to the pan.


2.  While oil is heating.  Cut the steak into strips.  You want to cut across the grain. You know you have done this right if you stretch the steak and it stretches.  I tried to make each steak about an inch thick.  They will get a bit wider when the breading is added.  See picture above.

3.  In two shallow dishes, add dry ingredients to one and the wet ingredients to the other.  Dip each strip into the dry and then the wet and then back into the dry.  I like to double dip mine.  Press the breading into the steak.  This helps to keep the breading attached to the steak finger.

4.  Fry each finger until golden brown and crispy on each side. Preheat your oven to 200 and keep fingers warm until the whole batch is fried up.  Do not over crowd the pan when frying.  Also let the oil get hot again before you add a new batch of fingers.

5.  When all of the fingers are cooked, you will be left with a pan full of flour/corn grains sitting on the bottom of the pan and a little bit of oil.  To make the gravy I added the coconut milk that was left in the can.  Add more if you need more gravy.  If the gravy is not thick enough, sift any left over breading that you have (to remove the chunks) and slowly add a bit at a time.  Bring gravy to the point of right before a boil.  It should be thick.  Taste the gravy and adjust seasoning according to your families taste preferences: more salt, more pepper, etc....


Written by Sherron Watson

Tuesday, July 8, 2014

Lacto-Fermented Ketchup


Over the past few years I have been doing some reading and research into Lacto-Fermented foods and the health benefits of introducing these recipes into our diets.  I have fun learning new skills and this technique of making and preserving food fascinates me.

Fermented food is something that I have always liked and enjoyed eating.  One of my favorites is sauerkraut.  I will have a recipe for this on the blog soon.  I have been making this ketchup for over a year now.  My kids eat a lot of ketchup.  A lot to me is 2 bottles a month.  We eat ketchup on our eggs, with meat, potatoes, hamburgers, etc....  I also use it as an ingredient in several recipes-meatloaf being the most popular.

I have two delicious meatloaf recipes on the blog:  Mini-Meatloaves and Meatloaf in a bread pan.


Organic Ketchup gets expensive when you eat as much as we do so I decided to make my own.  I like the flavor of this recipe.  Don't be shocked by the use of fish sauce.  The smell in the bottle is enough to gag you but once it is used in the recipe that all goes away.  If you are nervous for the first batch then use less and see how it taste to you.  Honestly, people love it when they come to my house and have no idea that fish sauce is one of the ingredients. 

If you are new to lacto fermented food I have several books that I keep in my cookbook collection to answer any questions that I have.  My first book is Nourishing Traditions by Sally Fallon.  It is a nice thick book that has lots of recipes for healthy eating.  The second book is True Brews: How to Craft Fermented Cider, Beer, Wine, Sake, Soda, Mead, Kefir, and Kombucha at Home by Emma Christensen.  The second book has more to do with drinks but we drink several fermented drinks in our home too.

Fermentation has helped me heal my gut.  It makes me feel good.  I don't have the stomach problems I have had in the past.  I hope to introduce you to more lacto fermented foods as I make and develop recipes for them over the next year.   It is something I really believe in and want to encourage people to make and use in their own homes.  This is a recipe from Sally's book to give you an idea of what you will find in her collection of recipes.

NOTE:  I have linked several ingredients and the books to my Amazon store.  There is no obligation to buy.  I make a small fee from each sale. This is a great way for me to share with you what products we use in our home. 


Lacto-Fermented Ketchup
Makes 1 quart-Adapted from Nourishing Traditions

3 cups canned Organic Tomato Paste
1/4 cup of whey (see below how to make this at home)
1 tablespoon sea salt
1/2 cup maple syrup--use the real thing
1/4 teaspoon cayenne--this is optional
3 cloves garlic, peeled and mashed
1/4-1/2 cup commercial Fish Sauce  <--this is the brand we use but any brand will work

1.  In a medium bowl combine and mix all ingredients until well blended.

2.  Add ketchup to a glass canning jar or any jar with a lid that seals.  I use the jars that have the spring loaded lids that latch on the side.

3.  Let ketchup sit on your counter for two days.  Find a dark part of your counter which is out of the way.  I add a sticky note with the date to it so I don't forget when I made it.

4.  After two days, stir ketchup and taste. Store in refrigerator.  Good for 2 months.


How to make whey:  Buy 1 large container of organic plain yogurt.  Place a piece of cheese cloth, folded several times, over a glass jar with a rubber band around the mouth, or tie the cloth to a sturdy wooden spoon and suspend the yogurt in the jar. The idea is the yogurt to drain and for the glass jar to catch the whey.  Pour yogurt into the cheese cloth.  Let it drip on the counter for 3 hours.  You should have about 1.5 cups of whey and some delicious greek yogurt.  (If you let it drip longer the yogurt will turn into cream cheese)  Store in refrigerator for up to 3 months.

The picture below is my whey that I keep in the refrigerator. The whey will settle once it has sat in the refrigerator.  The picture below is after it has been stirred.


Written by Sherron Watson


Monday, July 7, 2014

Sauteed Beet Greens


Beets have quickly become something that we eat a lot of in our home.  I hate to waste anything.  We have ventured into the territory of eating the greens instead of throwing them away.  They are a bit different than say, a spinach green, but equally as delicious. 

The simplest way is to saute them with a bit of bacon grease or oil.  I heat up a tablespoon of oil in a cast iron pan.  Rinse the greens and pat them dry on the counter while the oil is heating up.


I toss the greens into the oil and saute until wilted.  They do take a bit longer than spinach to cook. The leaves are sturdier.


 Just remember: heat oil, rinse greens, toss in oil, cook until tender, and serve.  I have written the recipe out below if you need it.

My favorite way to eat them is served with two over medium eggs.  The yolk adds great flavor to the sauteed greens.

I also will on occasion season the greens with balsamic vinegar, salt and pepper.  Really, use what you like and what you would normally dress your spinach with.

Enjoy this simple recipe!


Sauteed Beet Greens

Roughly 4 cups of beet greens, washed and cut into strips
3 cloves of minced garlic
1 tablespoon of olive oil
salt and pepper to taste
balsamic vinegar or fresh lemon juice

1.  Wash and pat dry the leaves.

2.  Heat oil in sturdy pan.  Add leaves and saute for 5 minutes.  Add minced garlic and continue cooking for 2 minutes.

3.  Remove from heat, season with salt and pepper.  Squeeze lemon or add balsamic vinegar.

4.  Serve immediately.
ritten by Sherron Watson

Sunday, July 6, 2014

Quinoa Fruit Salad #2 with a Creamy Yogurt Dressing #SundaySupper


Summer is here and we are just chillin' on this gorgeous holiday weekend.  I can't believe how cool and utterly perfect the chill in the air in Maryland is right now.  We are normally in the high 90's and maybe even in the triple digits this time of year and the humidity is off the charts--like you could cut it with a butter knife but not this year--YAHOO!

For Sunday Supper we are sharing a group of recipes that are refreshing and cool--just like our weather at the moment.  I made some quinoa salad this past week and this was our families favorite of the two fruit salads that I made.  I like this one too because the dressing is light but the kids like this one because the dressing is creamy.  

I hope you enjoy this easy and delicious salad.  Feel free to experiment with a variety of fruit combinations.  I made this again for the 4th and used cherries, blueberries , jicama and kiwi.  I also changed the quinoa to a triple combination of red, white and black.  I like a salad where the ingredients can be juggled based on what you have at home.  This is one of those that allows you to use a variety of your favorite flavor combinations.

To find a slew of other COOL desserts, go to the end of this post. 


Quinoa Fruit Salad #2 with a Creamy Yogurt Dressing 
Makes about 4 cups of salad

1 cup of prepared (cooked) quinoa
3 cups of fruit: peeled, chopped or sliced
1/2 cup Greek Gods Honey Yogurt (this is the brand I use)
2-3 tablespoons Lemon Balsamic Vinegar (buy the good stuff)
pinch of salt (optional)

1.  Prepare quinoa according to directions on the package.  RINSE and rinse and then RINSE again.  I rinse my quinoa about 4 times.  I even let it sit on the table for a few minutes just to be sure that I get the bitter flavor washed away.

2.  Dice, slice, peel, and cube the fruit of your choice.  I used for this salad: kiwi, jicama matchsticks, peaches and raspberries.

3.  In a small bowl whisk together yogurt and balsamic vinegar.  The flavor of the balsamic can also be varied.  I think that lemon and lime pair well with the quinoa.

4.  In a medium bowl combine the dressing, quinoa and fruit.  TOSS!  Taste and adjust the dressing.  I like ours to be light enough to see the fruit but my kids thought the opaque version of the dressing was better--LOL  You decide.

5.  Serve.  Keep in refrigerator if not served right away.


Summer Chillin’ with My Sunday Supper Friends

Brisk Beverages
Chilled Starters
Snappy Salads and Sides
Refreshing Main Dishes
Cool Confections
CSunday Supper Movement Join the #SundaySupper conversation on twitter on Sunday! We tweet throughout the day and share recipes from all over the world. Our weekly chat starts at 7:00 pm ET. Follow the #SundaySupper hashtag and remember to include it in your tweets to join in the chat. Check out our#SundaySupper Pinterest board for more fabulous recipes and food photos. Would you like to join the Sunday Supper Movement? It’s easy. You can sign up by clicking here—>Sunday Supper Movement.
Written by Sherron Watson


Sunday, June 29, 2014

Stained Glass Jello with Coconut Milk Panna Cotta #SundaySupper


We are celebrating summer and July 4th in our Sunday Supper group this week with things to take on a picnic, to the beach, your favorite neighborhood BBQ or simply to enjoy at home.

I have wanted to make this dessert for a while and decided to try my hand at a homemade version that would have less refined sugar and made from homemade ingredients.  

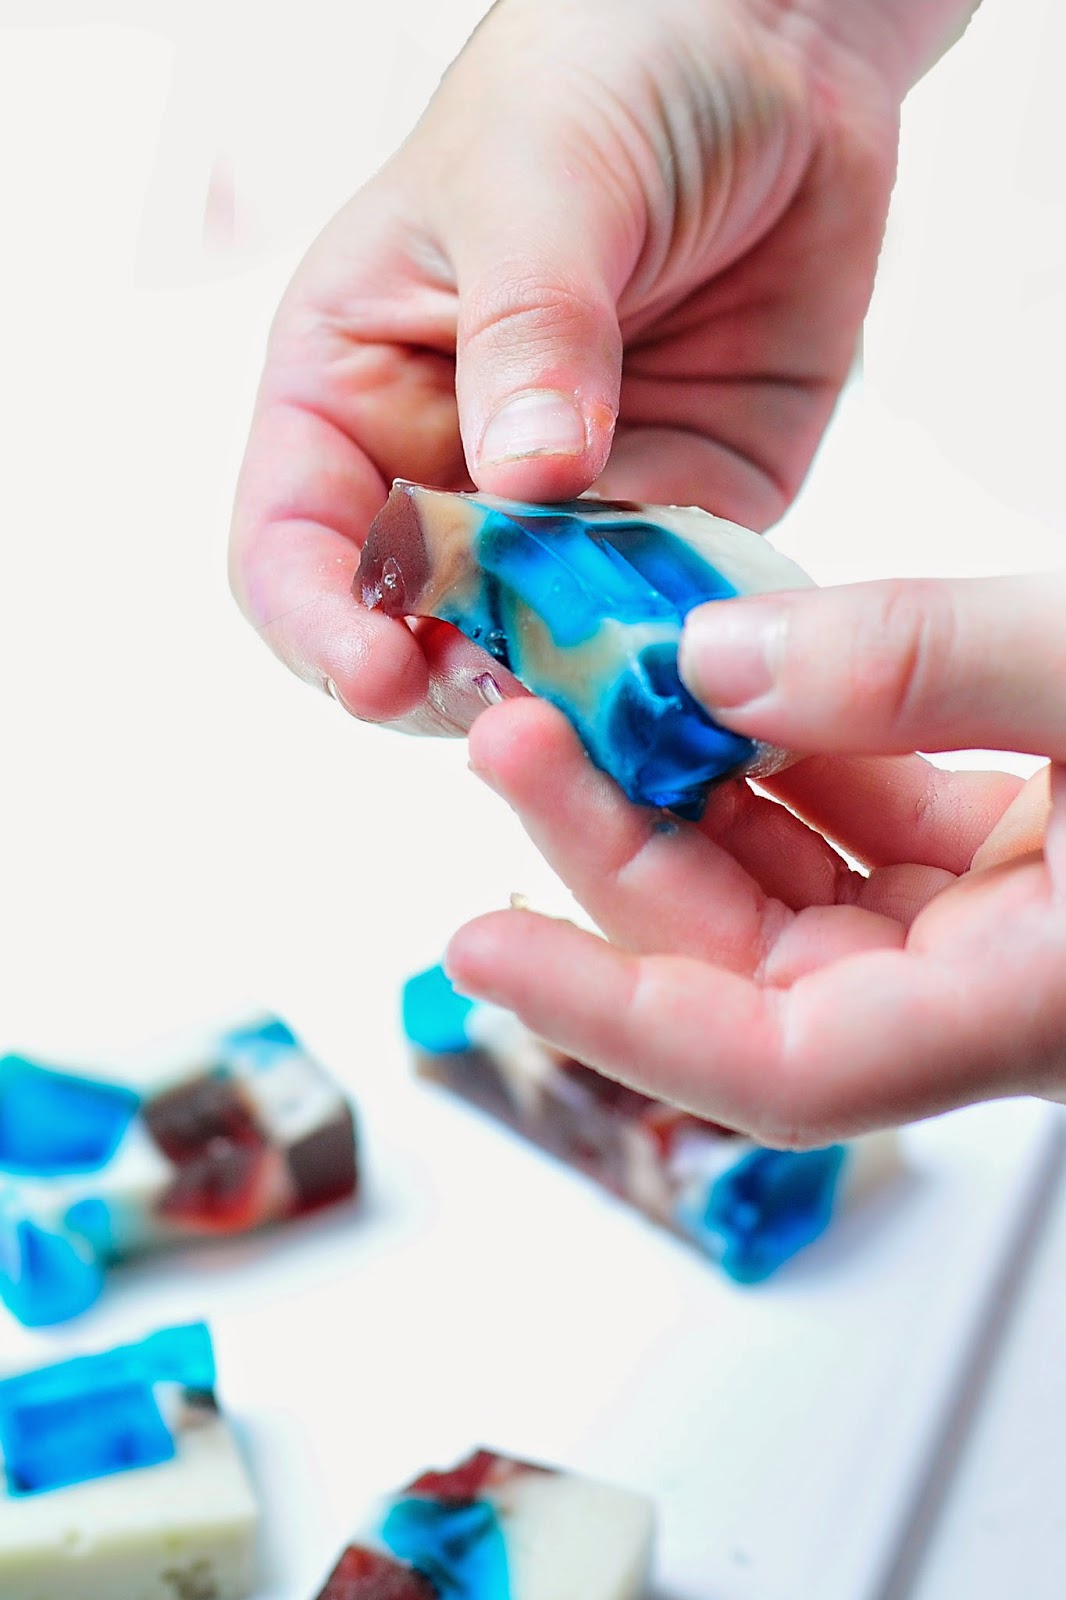
I recently bought beef gelatin and set out to make several things.  I first made my own jello.  The red jello you see is made with three simple ingredients: unsweetened pomegranate juice,  raw honey and beef gelatin.  It was really easy!  I have included the recipe down below.

The second thing I wanted to make was panna cotta.  I love the smooth, yet set, feel of this dessert. My only concern was the dairy.  We are trying to cut back and so I wondered if I could use coconut milk.  I discovered that you can and it works like a charm.  I added a bit more beef gelatin to the recipe to make it more "jello-like" so it is firmer than a regular panna cotta.  Recipe is also shared below.

So--you basically get three recipes for the price of one!  


A funny side note about the panna cotta.  I have a schedule each day.  The schedule is centered around nap times.  If you have kids and work from home you might relate to this issue too.  When nap times happen I know that I have exactly 92 1/2 minutes and 39 seconds (roughly speaking, of course) to get about 4 hours of work done.  

It is a race in my kitchen of grabbing, cooking, slicing, picture taking, cooking, washing--yeah, I am sure you are starting to get the picture--so imagine my complete and udder frustration when I have to deal with a malfunctioning piece of ---- (won't say that out loud).  

My husband, for 26 years, has held his tongue about owning an electric can-opener.  I cannot stand these things and have forbidden the purchase of one.  Well, I caved a month ago.  If he wants one, then fine--buy one. 

He did.

It has worked okay. Not great but I have suffered through it. I even put my hand-held can opener out into our trailer (by the way, that is a pop up and the kitchen is not close to the door).

Rye had a follow-up appointment with her oral surgeon and Cory drove so that during nap time I could make this dessert. Everything was fine and on schedule until it came time to make the panna cotta.

Two cans of full fat coconut milk are needed and outside of gnawing the tops off I had to use the electric can opener. I mentally prepared myself and hoped for the best.

Well, I fought with that dang thing for 30 minutes trying to get it to work. I won't repeat the thoughts that were going through my mind but it involved the use of my windows and possibly a huge sledge hammer.

I am trying to be zen like and not get too excited about little things like this and so I decide its not worth it and get my knife and hammer out. DO NOT DO THIS AT HOME--unless you are desperate and need to work while your baby is asleep.

To make a long story short, I got the cans open, made the panna cotta and made my husband stop by the store for a manual can opener on his way home.

I think that peace will once again return to the Watson home.  

You will notice that I have included two pictures that are not stained glass. This is how I used any of the leftover ingredients. I made individual portions to see how it would work.  I loved that they slipped out of the little pyrex bowl and made these cute little desserts.  Next time I will serve them with some berries and whipped cream.


Isabella thought they were really fun to play with and slurp.

Do you remember slurping Jello as a kid?

Please visit my fellow Sunday Supper contributors to learn, discover and find a few more delicious recipes for your summer fun.  Links are at the end of this post.


Stained Glass Jello with Coconut Milk Panna Cotta

Makes one 7X11 baking pan

1 box of blue Jello, prepared for the Jigglers
1 batch of homemade red beef gelatin Jello, recipe below
1 batch of homemade coconut milk panna cotta, recipe below

NOTE:  I used a store bought Jello box because I could not find any true blue juice at my grocery store and in order to do a red, white and blue theme--I had to use this product.  You can also make this using any color gelatin and name it "Broken Glass"  or  "Sea Glass".

1.  Take prepared Jello's and dice them into small pieces with a sharp knife.  Mine ranged in size from a half inch to smaller.


2.  Place all of the blue and red jello pieces in the bottom of a baking dish.  If you use a larger or smaller version than what is recommended your dessert will be either thinner or thicker.

3.  Prepare the coconut milk panna cotta and pour over the red and blue pieces.  Cover with plastic wrap and refrigerate until solid.  About 2-3 hours depending on refrigerator.

4.  When set, remove from refrigerator and slice to serve.  I sliced mine into bite size rectangles.  They can be cut using your favorite cookie cutter too.

5.  Store left overs in an air tight container and refrigerate.


Homemade Jello

1 cup of unsweetened juice.  I used pomegranate to get the red.
1 tablespoon beef gelatin
1 tablespoon raw honey

1.  Add juice and gelatin to a small sauce pan.  Let sit for 5 minutes.  The gelatin needs time to soften and expand.

2.  Place sauce pan on medium heat and warm.  DO NOT BOIL!  Boiling will ruin the gelatin.

3.  Once the juice is warm.  Remove from heat and add honey.  Stir until combined.

4.  Add juice-gelatin mixture to a small bowl.  My bowl was square 4X4.

5.  Let set in refrigerator.  At least an hour.

6.  Remove from refrigerator and serve.  Cut into small pieces, slabs, shapes, etc...


Homemade Coconut Milk Panna Cotta

3 cups (or two cans) of full fat coconut milk
3 tablespoons beef gelatin
1/3 cup raw honey
2 teaspoons of vanilla

NOTE:  A traditional panna cotta is served with berries or has berries in it.  I used the red and blue jello in place of this in the pictures above.  This panna cotta will set very firm.  To make it softer but still set, use 2 tablespoons of gelatin instead of 3.

1.  In a medium sauce pan add one can (1.5 cups) of coconut milk and gelatin.  Let sit for 10 minutes.

2.  Place sauce pan on medium heat and warm coconut milk.  DO NOT BOIL.  When steamy, remove from heat and add remaining ingredients.

3.  Let cool slightly--if you don't do this part--then you will see some of the jello bleed into the dessert.  This did not bother me but you may think differently.  I suggest wait about 10 minutes.  If you are not adding it to a dish full of jello pieces, then go ahead and add to your serving dishes (large or small) and wrap with saran wrap.

4.  Let set for 3 hours.  Serve with berries and whipped cream.


LOOKIE HERE---LOTS OF DELICIOUS PICNIC RECIPES! 

ENJOY

Are you looking for picnic recipes? Look no further than this fabulous list by Sunday Supper contributors. It is everything you need for a scrumptious day in the great outdoors.

Beverages
Orange Blossom Iced Tea by girlichef
Red, White, and Blue Sangria by Hezzi-D’s Books and Cooks
Rosemary Nectarine Sparkling Cocktail by Food Lust People Love
Best Picnic Wines by ENOFYLZ Wine Blog

Appetizers
Baked Garlic Parmesan Wings by Cindy’s Recipes and Writings
Buffalo Chicken Spring Rolls by Daily Dish Recipes
Peppadew Dip by Confessions of a Culinary Diva
Savory Red, White, and Bleu Truffles by Culinary Adventures with Camilla

Mains
Asparagus and Cheddar Quiche by Mess Makes Food
London Broil with Caramelized Red Onions by Crazy Foodie Stunts
Stilton Potato and Stilton Pies by Jane’s Adventures in Dinner
Waffle Batter Fried Chicken Tenders with Maple Mustard Dipping Sauce by Kudos Kitchen by Renee

Sides
Mushroom and Gruyere Cheesecake by Peaceful Cooking
Scotch Eggs by Small Wallet, Big Appetite

Salads
Caprese Pasta Salad by La Bella Vita Cucina
Farro & Walnut Salad by Foxes Love Lemons
Fruit Tortellini Salad by Jelly Toast
Gluten Free Potato Salad by Gluten Free Crumbley
Japanese Noodle Salad by Noshing With The Nolands
Kale and Quinoa Tabbouli by Healthy. Delicious.
Layered Chicken Salad by Nosh My Way
Lightened Up Macaroni Salad by Peanut Butter and Peppers
Loaded Potato Salad by Granny’s Down Home Sassy Southern Cooking
Mexican 3 Bean Salad by Bobbi’s Kozy Kitchen
Old Fashioned Potato Salad by Life Tastes Good
Orzo Salad with Kale Pesto by Cooking Chat
Pizza Pasta Salad by Curious Cuisiniere
Red, White and Blue Fruit and Cheese Salad by Shockingly Delicious
Tomato Bean Salad by Family Foodie
Tuna Noodle Salad by Hot Momma’s Kitchen Chaos
Vegetable Salad by Magnolia Days
Veggie Pasta Salad by Pescetarian Journal
Watermelon and Feta Salad with Verjus by The Wimpy Vegetarian

Sandwiches and Wraps
Pan Bagnat by A Kitchen Hoor’s Adventures
Panino con la Salamella by Manu’s Menu
Roast Beef Wraps by Cookin’ Mimi

Sweets
Banana Pudding Cheesecake by Serena Bakes Simply From Scratch
Berry Cheesecake Chocolate Chip Cookie Cups {#glutenfree option} by Cupcakes & Kale Chips
Cherry Chip Blossom Cupcakes by NinjaBaking.com
Cherry Pie Crumb Bars by The Girl In the Little Red Kitchen
Chocolate Chunk Brownies by What Smells So Good?
Chocolate Syrup Brownies by That Skinny Chick Can Bake
Chocolate Zucchini Cake by Killer Bunnies, Inc
Coconut Oil Chocolate Chip Cookies by Alida’s Kitchen
Flag Cake by Pies and Plots
Peanut Butter Frosted Brownies by Feed Me, Seymour
Red, White, and Blue Berry Angel Food Cake Parfaits by Neighborfood
S’mores Crumb Bars by The Redhead Baker
Stained Glass Jello with Coconut Milk Panna Cotta by Simply Gourmet
Strawberry Banana Oat Muffins by Sue’s Nutrition Buzz

Join the #SundaySupper conversation on twitter each Sunday. We tweet throughout the day and share recipes from all over the world. Our weekly chat starts at 7:00 pm ET and you do not want to miss out on the fun. Follow the #SundaySupper hashtag and remember to include it in your tweets to join in the chat. Check out our #SundaySupper Pinterest board for more fabulous recipes and food photos.


Would you like to join the Sunday Supper Movement? Click here: Sunday Supper Movement


WRITTEN BY SHERRON WATSON


Thursday, June 26, 2014

Figgy Bites


You can thank my daughter for calling these little balls of delight "Figgy Bites". She gets full credit for naming them.

I was going for the obvious choice: Fig Balls.  

I think she was a bit embarrassed...LOL

I am loving them no matter what we call them.  They disappeared from our fridge really fast.

In my mind it is like eating just the center of a Fig Newton.  This used to be my favorite cookie before I found out that my body doesn't like wheat.  Some day I hope to work on a gluten free Fig Newton Cookie but for the time being I will just eat a few Figgy Bites.

They are really easy to make.  The centers are great by themselves and that makes them a simple snack.  But if you want to up the WOW factor and add a gourmet touch then add a coating.  I chose to roll mine in crushed almonds.  

Rye?  CHOCOLATE!!!!!

Guess which ones were eaten first?  

I also thought they would be awesome rolled in toasted coconut, pistachios, crushed Chex cereal, and cocoa powder.  The cocoa powder would make them look like truffles.  YUM!

Next week I have some great recipes coming out.  I have been sharing a lot of simple things because that is what has been easy for me the last 9 months.  I am pretty much back into the groove of things and working on some more advanced recipes for the gluten free cook.  I have a wonderful gluten free pasta dough and a blueberry bread loaf that will knock your socks off or flip flops (summer time wear).

Please Pin, Share and Comment--I love to hear from my readers.

ENJOY!


Figgy Bites

1 1/2 cups almond meal
1/2 cup cocoa powder
1 teaspoon vanilla extract
1/2 teaspoon sea salt
1 cup soft dehydrated figs, stems removed
1 tablespoon water
1/4 cup maple syrup

Coating the bites is your choice: any ground nut, cocoa powder, toasted coconut, etc

1.  I used my Vitamix.  I tossed everything into the pitcher and let it blend until well combined.  Use the stomper to mix as it blends.

2.  If you do not have a Vitamix, then use a food processor.  Add all of the ingredients and blend until the ingredients.  If it is having trouble blending because the dough is stiff, add a tablespoon of water at a time until the dough forms.  It should be stiff but I don't want you to burn up your food processor.

3.  I used a cookie scoop.  A small size is perfect.  Scooped the fig dough into balls and placed them on a parchment paper-lined cookie sheet.  Refrigerate until firm, about 1 hour.

4.  Remove and roll in your choice of coatings: nuts, chocolate, sprinkles, cocoa powder, etc...

5.  Store in the refrigerator.

Written by Sherron Watson


Donut Breakfast Casserole

--------------------------------------------------------------------------------------------------------------- 1.  Share  this pos...

Popular Posts