Wednesday, January 2, 2013

Wasabi Cucumber Salad


Our favorite Sushi restaurant in Annapolis is not downtown, but up by the Annapolis Town Center.  Yama Sushi is amazing!  The restaurant is long and narrow with bright orange walls.  The staff are all young and greet you with a smile.

It used to be that we could go in and find a seat without little delay.  It seems each time we go that it is seeing a greater rush of business.  I am happy for them.


This wasabi salad is something I came home and made after visiting them one night last month.  I love the flavor of wasabi and vinegar together.  If you enjoy spicy and sweet then these cucumbers will fit the bill.

In my opinion, the longer they marinate the better they become.  The slices will loose some of the bite and crispiness that the first few days have to offer, but throwing a spoonful of them onto a salad or over an avocado---is wonderful--no matter how crispy or not, they are.


Recipe: Wasabi Cucumbers

1 English Cucumber, peeled, halved and sliced
1 1/2 teaspoon of wasabi powder
2 Tablespoons of red wine vinegar
2 teaspoons of sugar
1 teaspoon of sesame oil
dash of salt
2 green onions, sliced
1 tablespoon of toasted sesame seeds

In a container, add all of the above ingredients.  Cover and let marinate for a minimum of 4 hours.  I think they are best after 24 hours.  They will last a good month in your fridge.

This recipe has a lot to do with taste.  I have used the Japanese rice wine but find it not sweet enough and this is why I like to use the red wine vinegar---but please try your favorite wine vinegar.

Wasabi powder is strong---start with the recommended amount and if you want it stronger, please add more.

Sugar is the sweetener and again--is a starting point for the recipe--if you need the cucumbers sweeter, then add more sugar.

The key to this recipe is finding YOUR favorite balance of sweet, sour and spicy.

I hope you enjoy the recipe!

Written by Sherron Watson


Friday, December 28, 2012

Chicken/Tuna Melts


December is coming to an end and with that we must face a New Year.

2013 almost did not happen-according to the Mayan calendar or those that predicted the end of the world in previous years.  Personally, I never believed any of the dates or calendars.

I won't judge, though if you did.  We are each entitled to our own belief.

I will have to share a funny story with these events in mind.

On December 20, my family and I were enjoying our 12 Days of Christmas celebration (we each were given a white shirt and asked to decorate it).  Having just finished and restoring the caps to the markers, the lights began to flicker.

We live in a very wooded community and so this is not unusual.  We roll our eyes and jokingly say, "not again?".

This time, it was different.  The lights flickered off and on at least 10 times-fading in an out-not the usual on and then off again motion of previous outages.

Eventually they were out.  I mean OUT OUT-for 6 hours OUT!

We looked outside and the darkness was so black.  Usually when we lose power you can see a glow in the distant and we know that the big city is still bright and merry.  Not this time.

It was silent, dark and very cold.

We decided to light our candelabras and sit around the table.  I have had these candles since we were married.  They are silver and have been used for every Christmas and important holiday.  They are showing their age and yet I cannot depart from them.  As I watched the wax roll down the side of each candle, heard the laughter of my children and saw their smiles--I knew that I was being given a very special memory to archive for future story telling opportunities.

Little did I know that our night would get even better.

We thought it strange that we did not hear any fire trucks or sirens.  When the power has gone out before we hear these in the distant and this will sometimes give us a clue as to why we may have lost power- a fire, a car accident or something else.

What we did hear was a hum.  A low hum coming from outside.

Drake walked to the front door, opened to find a green glow over in the direction of the high school.

We all quickly ran to the windows and peered outside.

For the first time, I thought the Mayan's might have been right.  I know it's funny but when you see something that you have only seen in movies before your eyes, your mind does strange things.

Mine did.

I really said this, "Cory, are those aliens?"  Silly, huh? For a few seconds I thought the Mayans had predicted the end of the world and it was going to be at the hand of little green men.

It made me anxious, Isabella was in tears and the big kids thought they were in for the ride of their lives.  Dad was just cool and sat there working on his shirt, by candlelight and taking in the conversation at the table.

We mentioned more than our fair share of Zombie and Apocalypse type jokes through out the rest of the night.

To end the night we brought out our Tarot cards and had some fun.  This is something that we enjoy doing as a family.  I know that many don't understand the cards, don't believe in them or may even think they are evil.

To us, they have been a fun way to see our lives, think about the possibilities of our future, help understand the past and refine things in our present day.

It's not for everyone, but our family, on this night, drew comfort from being together and doing something that sparked great conversation and a memory that none of us will soon forget.

I awoke the next day thinking to myself, that I had just partook of the best day of my life for the year 2012.  My Christmas gift came a few days early and I can still feel the gratitude I will forever hold to; that for a few hours, the lights went out, technology turned off, the candles were lit and we enjoyed each other uninterrupted.

With the memories of 2012 still close to our hearts and our future before us,  my goal to simplifying my life is one that I will take with me into 2013.  This recipe is an easy one that I hope will lighten your load on a busy night.

I am sharing with you a biscuit idea that I first tried for my family a few years back.  I am pretty sure I found the recipe on the back of a Grands biscuit tube.  You can use tuna or chicken to make the salad.  My family prefers chicken.

If you need to use gluten free biscuits, HERE is an easy recipe that I make.  They will need to be precooked as the recipe below suggest.

Recipe:  Chicken/Tuna Melts

1 (13 oz) can of diced chicken, drained
1/4 cup of green onions, diced
1 celery rib, diced finely
salt/pepper to taste, usually just a dash of each
1/2 cup of mayonnaise
1 Tablespoon of red pepper, diced finely
1 cup of shredded cheddar cheese + more for topping
1 can of Grand's biscuits or a batch of Gluten free biscuits

Preheat oven according to directions on biscuit can.

Bake the biscuits according to those directions.

In a medium sized bowl, combine the remaining ingredients.

After the biscuits have cooled for a few minutes, cut in half.

Turn oven to broil.

Put a small scoop of chicken salad on top of each biscuit halve with a bit more cheese.

Place each halve on a cookie sheet and broil until cheese has melted.

Remove and serve.

Written by Sherron Watson


Thursday, December 20, 2012

Gluten Free Cornbread


Some days I just want comfort food.  Something warm, and filling.  I want to feel and taste my blues away.

Why does food have the ability to offer comfort when sometimes a hug or a kind word does not?

I think of corn bread as comfort food because it reminds me of days spent with my family growing up in California.   It stirs a memory of my family being snowed in to our home in Utah during a winter storm.  I am instantly thinking of the chili recipe that my brother n law shared with me last year.  He was so proud that he created a dish that won first place.  I was able to recreate it for my family and make this cornbread to go with it.

This past week we have, as a nation and country, felt great sorrow and pain.  We see ourselves in the shoes of those parents that lost loved ones.  We remember a time that fear was felt in our spines.  I, for the first time, thought about my safety and that of my family, in greater detail.

I became more aware of my surroundings.  I noticed every person in line.  I watched with an uneasy eye as I entered the grocery store.

I cried.  I tried to reason in my mind why something of this nature could and would take place.  I was at a loss for words.  It hurt to my core.

All this emotion and I was someone on the outside looking in through the media, internet and personal stories being shared with friends.   I cannot even begin to understand the emotion and loss that the town in CT felt or those affected by the Clackamas Town Center shooting in Oregon.

Clackamas Town Center is a place that I worked when I graduated from high school, I sat numerous times on Santa's lap, I enjoyed ice skating with my family and friends on weekends, I visited See's Candy more than was necessary; this was my neck of the woods growing up, and yet, I have not lived there for many years and the shock of what happened still confuses me.

I never heard of Sandy Hook Elementary before Friday but I can guarantee to you that I will never forget the school or the poster of those that lost their lives.

This week has left me questioning everything.

With this questioning I know some things for certain.  I know that I love my family.  I know that there are many many good people in this world.  My hope is that I and my family will not live by the fear that is so easy to feel at times like this.  I want my kids to understand that bad things happen but from them we must learn and see the good.  I know that the loss and heartache will ease with time.  Never forgotten, not buried but put into a special place that can be visited with fond memories and joy deep within our souls.

Our world is changing.  I would hope for the better but I don't know.

Words are hurtful and mean or they can be comforting and caring.

I have seen the hurtful words a few times this past week and it makes me sad especially during such a sorrowful time.  We all have opinions and ideas of what should be the change to come and how it should manifest itself; we all have varying ideas that make discussing these items challenging.  We all come from different experiences and lives.

So it is because of the events of the last few weeks that I needed some comfort food.  I wanted to escape for a few minutes into a few memories that brought a smile to my heart.

Enjoy this easy cornbread recipe the next time you make chili or beef stew.  It would also make a great brunch item served with honey and butter.

Enjoy


Recipe:  Gluten Free Cornbread

1 cup of corn meal
1/3 cup of sorghum flour
1/3 cup of tapioca starch
1/3 cup white rice flour
1.5 tablespoons baking powder
1 teaspoon of salt
3/4 cup of milk
1/3 cup of oil, I used sunflower oil
2 whole eggs
1/2 cup of corn, drained

Preheat oven to 400 degrees.  If using a cast iron pan, put into oven now with 2 tablespoons of butter.

While your pan and oven are preheating, combine the dry ingredients in one bowl.  Whisk to blend.

In a small bowl, combine wet ingredients.

Add the wet ingredients to the dry ingredients, fold in the corn.

Remove hot pan from oven and add cornbread batter.

Bake for 15 minutes or until lightly brown on top.  the middle should be firm to the touch.

Written by Sherron Watson


Monday, December 17, 2012

Almond Orange Cookies, gluten free


Sometimes  I have failures in the kitchen.  At times, it is devastating, and then other times, it's not.  Like THIS one time (at band camp).  <----- I couldn't help myself.  This is the one movie quote that is used over and over in my house….. I digressed, sorry.  Back to the story now.

I had set out to make an Almond Florentine Cookie that was gluten free. It was my first attempt and I was excited.  

I had gathered all of the ingredients, prepped the cookie sheet and preheated the oven.

My first batch was scooped and spaced equally apart.  The timer was set.

Imagine my surprise when I opened the door of my oven expecting to see a flat cookie to find these perfectly and evenly spaced scoops of almond orange cookie dough.


I scratched my head, pulled them out and thought, "what a waste of ingredients".  That is usually the first thing that comes to my mind when something does not go right, the waste of food.  

My kids could smell the cookies down the hallway and soon my kitchen was filled with teenagers all asking for a cookie.  With my pride, as a cook, in the palm of my hand, I handed them each a failed cookie.

Only to them, they had no idea of what the cookie should look or taste like.  In their minds, I had made a cookie.  Plain and simple.

I quickly made the second batch, as to not waste the dough, and turned around to find the first batch gone. 

They loved them.  NICE!

In the process of trying to make a classic gluten free cookie, I had made a new favorite among my kids and their friends.

I decided to get fancy and decorate the second batch with a bit of chocolate, ground almonds and orange zest.

Not only did they taste delicious (I finally got to try one) they looked beautiful too.

I have yet to figure out a good gluten free florentine cookie but these little morsels of orange and almond will do until I get around to the other recipe.  ENJOY!


Recipe:  Almond Orange Cookies
Makes about 20 cookies

4 tablespoons of melted butter
1/4 cup of sugar
1 cup of almonds, chopped finely
2 teaspoons of orange zest
1/2 cup of almond meal
2 tablespoons of coconut flour
1/4 teaspoon of baking powder
pinch of salt
1 tablespoon of potato starch

To top the cookies:

Chocolate chips to melt (optional)
Orange zest (optional)
Ground Almonds (optional)

On the stove, add butter and sugar.  Bring to a boil and remove from heat.  Cool slightly.

Add remaining ingredients to separate bowl and stir.

Combine the flour mixture and butter mixture together.

On a cookie sheet lined with parchment paper, scoop cookies.  They will not spread so they can be close together.

Bake for 10 minutes.

Remove and transfer to a cookie rack.

Dip each cookie into melted chocolate, garnish with almonds and orange zest.


Friday, December 14, 2012

Lasagna Cups


I am always on the look out for easy recipes to make for my family.  This is one recipe that I have seen a lot recently and thought to give it a try.

I write for a local magazine and for January my task was to come up with conventional recipes that have been given a make-over.  I thought this fit the tab perfectly.  When I think of lasagna I automatically see a huge 9X13 inch pan loaded with cheese, meat, sauce and noodles.  These little cups, baked in a muffin pan, give this already popular dish a sleek new look.

I don't have an original source to link this recipe to.  If anyone has that information leave it in the comments and I will give full credit to that person.  UPDATE: I was contacted by Connie from Smitten Foodie that she had made these cute lasagna cups toward the beginning of the year (THANK YOU for letting me know).  Please visit her site and see how she created her cups.  The ingredients that she used are different then mine so you will have two recipes to use the wonton wrappers for.

The cups were easy to throw together, even the kids could get in on the action and the best part was they were easy to eat.  

I went the route of using my leftover meat in the fridge and using an organic premade sauce.  If you want to make a simple marinara from scratch, I have this recipe that is delicious.  GO HERE.

If you would like to make gluten free wonton wrappers, this is a great recipe from Gluten Free on a Shoe String.  GO HERE for recipe.

Better Batter Gluten Free mix has a recipe too, go HERE.

Here is a video I found on the internet to show you how to make the a different gluten free wonton wrapper.  See below:


My kids don't have to eat gluten free, even though they do most of the time, so this is something I made when they had friends come over last weekend.

Sometimes it is  just nice to have options, and I like this option.


Recipe:  Lasagna Cups
Adapted from Smitten Foodie

Makes 12 cups

1/2 pound ground beef, cooked and drained
1 cup marinara sauce or your favorite tomato based sauce
1 cup of mozzarella cheese, grated +1 cup for topping (see below)
1/4 cup of parmesan cheese, grated
1/2 cup cottage or ricotta cheese
24 wonton wrappers (link for gluten free wonton wrappers is above)

Topping: 1 cup of grated mozzarella cheese

Preheat oven to 350 degrees.

Spray your muffin tin with Pam.

Line the muffin tin with 12 wrappers.

In a small bowl combine the three cheeses and mix.  You can combine the meat and sauce too if you would like, I did not and they turned out great.

I used a small cookie scoop and added a scoop of the cheese mixture to the bottom of each wrapper.

Add a small spoonful of meat and then sauce.  Added the second wonton wrapper.

Repeat with cheese scoop, meat and then sauce. You should have two layers in each cup.

I topped each of my cups with more shredded mozzarella cheese.

Baked for 15-20 minutes until bubbly and wontons are brown.

Remove from oven and let set for a few minutes, run a plastic knife around the cup and remove to a serving plate.

See pictures below:


Written by Sherron Watson


Thursday, December 13, 2012

Boozy Fruit Cake #TwelveLoaves

Fresh out of the oven...

…and soaked in Cherry Brandy for two weeks.

Why the two photos?

They show you the difference between a fruit cake without age and brandy and with age and brandy. Two things I think are important to your experience with eating fruit cake.

I relate fruit cake to sushi. You either like it or you don't.  I know lots of people (especially my family) that swear they don't like sushi.  WRONG.  They don't like bad sushi.  There is a difference.

I think the same can be said of fruit cake.  Most people will turn their noses up because they have tried it before and found it to be undesirable, too sweet, too this or too that.

Buying a fruit cake from a mail order company or the grocery store is like buying sushi from, well, the grocery store in the prepackaged containers.  It's a different experience than eating it fresh or homemade.

My Mom now loves sushi and now she loves fruit cake.  I believe when trying something as unique as these two items are that you really need to give yourself several chances to say if it is liked or not.  Of course, this is just my opinion, but I do feel that there are  right and wrong ways of preparing lots of food dishes and sometimes we experience the bad before we get the experience of trying something at its best.

I asked a few friends why they don't like fruit cake and their was one fashionable answer and that was the fruit that was used.  Many preferred dried fruit to the candied fruit.  I personally don't have a preference and since this cake does not have any sugar added to it I used candied fruit.  The sweetness from the cake comes from those sweet pieces of candied yumminess.

It worked perfectly!

My husband was one of those that said, YUCK, when I went to make the fruit cake and to his amazement when he tried the cake after a few weeks he smiled.  He loved it!  WHY?  I have to assume it is because he was finally introduced to a fruit cake that tasted like it should: moist, flavorful, sweet and boozy.

I participate in a wonderful group of food bloggers that encourage and share homemade recipes each month, Twelve Loaves.  Our theme this month was "boozy" breads.  I had actually made this fruitcake, which is considered a quick bread, a few weeks before learning of the theme.  To learn more about the group and to participate see below:


We would love to have you join our #TwelveLoaves group; it’s easy!

  1. Make sure that your Bread this month is inspired by this month’s theme of Bread and Booze. Knowing some participants might not imbibe, it is acceptable to submit an entry that uses a juice in your bread recipe in lieu of booze. Including either booze or juice in December is obligatory if you would like your link to be included!
  2. Have your #TwelveLoaves bread that you baked during December, 2012 posted on your blog by December 31, 2012.
  3. When you post your #TwelveLoaves bread on your blog, make sure that you mention the#TwelveLoaves challenge in your post and include links to the leaders:  Creative Culinary, Lora atCake Duchess who has a beautiful Christmas yeast bread and Jamie with LifesaFeast who has also done a quick bread with orange and cranberry. I want them ALL!
  4. Make sure you include a link to the bread that you bake this month using the link tool at the bottom of this post.
  5. Feel free to promote the Twelve Loaves group by proudly displaying the Twelve Loaves badge in your Twelve Loaves post as well as in your sidebar!
Not mandatory but you can follow @TwelveLoaves and/or #TwelveLoaves or chat with your hostesses onTwitter: Barb @CreativCulinary, Lora @cakeduchess and Jamie @LifesaFeast.

C’mon – Join us and Get Your Bread On!!


I hope that you will feel inspired to participate as we head into the new year.  Baking bread is fun and the term "bread" can be applied to lots of styles as you will learn if you follow our group.

I know that I will not be able to persuade everyone to love fruit cake but I do hope that you give it more than one chance in your lifetime because it does comes in different qualities and flavors.

This recipe is for a gluten free version and honestly I like it better than the non gluten versions that I have tried.  It uses almond meal and fits great with the "nut and fruit" theme of all fruit cakes.

If you choose to not make this "boozy" you can use your favorite flavored extract.


 Recipe:  Boozy Fruit Cake

1 cup almond meal
1/2 teaspoon cardamon
1/2 teaspoon nutmeg
1/2 teaspoon cinnamon
1/2 teaspoon salt
1/4 teaspoon baking soda
1/4 teaspoon baking powder
1.5 cups chopped pecans
1.5 cups of chopped almonds
2.5 cups of candied fruit,  I used: papaya, pineapple, raisins, cranberries
1/2 cup maraschino cherries, drained and cut in half
3 large eggs, at room temperature
1/4 cup maple syrup
1 tablespoon of brandy

topping:

1/4-1/2 cup of cherry brandy


NOTE:  When chopping the nuts keep in mind that the smaller you chop them, the easier the slices are to cut. I kept my almonds a bit large and noticed that each time I sliced it, I struggled to get clean pieces.

Preheat oven to 300 degrees.

Combine all of the fruit and nuts into one large bowl. Mix.

Add the remaining ingredients and stir to combine well.

Use a bread loaf pan with a piece of parchment paper pushed into the pan.  This will help you to remove the fruitcake easier.  Spray the ends of the pan if your parchment paper does not cover them.

Pour mixture into loaf pan.  Using the back of a spoon gently push mixture down and the top is smooth.

Bake for 65 minutes.  The fruit cake should be firm to the touch and puffed up slightly in the middle.

Let cool for 10 minutes and then remove to wire rack to cool.

Once fruit cake is cool, prepare it to be wrapped in plastic wrap.  Before you fold the wrap around the fruit cake, slowly pour the cherry brandy over the top of the cake.  Let it seep into the cake.

Wrap the cake several times so that it will not leak and store in your refrigerator.  I like to let my cakes sit for at least two weeks, the longer the better.  

They say fruit cakes prepared this way can last a long time…ours never stay around long enough to find out.  LOL


Since we talked about Sushi, this is my cat, Sushi.  She loves to help me when I take pictures.  On this day she just watched my every move.  She is a Maine Coon and I love her wacky personality.

Authored by Sherron Watson

Wednesday, December 12, 2012

Bacon and Corn Griddle Cakes, gluten free


Bacon and corn, enough said!

I am pretty sure you already know my love and passion for this combination.  If you need a gentle reminder, check out this recipe I make with corn and bacon.

The two flavors just work and make my belly super happy.

I saw this recipe from Recipe Girl for her bacon and corn griddle cakes and fell in love.  

As is usually the case with most recipes, I have to convert them to a gluten free version and so for the original please visit her site.  To get to the original recipe go HERE.  The pictures that she has shared with this recipe are enough to make you lick your screen, or maybe that was just me…LOL

Do you remember as a kid having a glass jar under the sink that was layered with all different colors and layers of grease?

No? Yes?

I sure did.  It was bacon grease. My grandmother and Mom both saved the grease after every batch of bacon they made.  They would use it for everything.  I don't remember when my Mom stopped doing this but one day the jar was gone.

I have read recently where this is coming back into fashion.  I don't know how I feel about storing bacon grease for weeks and using it often BUT I do know that for this recipe having the bacon grease readily available to cook these cakes in, makes them that much better.

I don't mind using bacon grease in moderation.  

Oh the things we remember from our childhood.  I love the memories I have with my kitchen and the food I ate way back then and the memories I am making for my kids today.  

It makes me smile. 

I cannot wait to make these again nor can my family. ENJOY


Recipe:  Bacon and Corn Griddle Cakes, gluten free
Adapted from Recipe Girl

4 slices of bacon, cooked crispy and cut into small squares
1 cup of corn kernels, drained
2 tablespoons of green onion, diced
1/4 teaspoon of salt
1/2 teaspoon of baking powder
1/2 cup of  brown rice flour
1/4 cup of corn meal
1/4 cup of tapioca starch
1/4 cup of almond meal
1/4 cup of milk

Bacon grease or oil to fry cakes 

In a medium fry pan with heat set to medium high, heat oil or bacon grease until hot.  

In a large bowl, combine all of the above ingredients and stir to combine.

I used a cookie scoop and placed 6 scoops in my pan.  Fry on both sides until golden brown.  (3-5 minutes).

Remove to a wire rack and let cool slightly.  Serve with your favorite sauce or eat as is.

See pictures below for steps to frying griddle cakes.


Written by Sherron Watson


Tuesday, December 11, 2012

Currant Amaretti Cookies


Looking for a recipe is a lot of fun for me.  I spend a fair amount of time searching blogs, magazines and Pinterest.  I get recipes mailed to me by total strangers. These recipes have been handed down from family member to family member.  These usually come with just the ingredients and the person emailing would like me to figure out how it goes together and the technique used to get from a list of ingredients to a fabulous recipe.  

I have stacks of papers that I have printed in piles around my office.  My husband thinks I am a hoarder when it comes to paper…LOL

Why the constant search?  For me it is the creative process that I use to develop a recipe.  I take lots of input on certain ingredients, cooking methods, flavors, techniques and foods and then an idea starts to grow.  

I always have a notepad with me…ALWAYS!  When I am sitting waiting for a friend or my kids I write notes and lists.  As my ideals come together and the recipe starts to form I feel a certain amount of excitement and joy.  I would relate it to an artist staring at a blank canvas and once the paint hits the brush, then the white slowly transforms into a picture, the story unfolds and a masterpiece is born; or in my case, a recipe.

I find a lot of inspiration among my friends in the food world.  I printed a recipe about a month ago for an Apricot Amaretti Cookie by my friend Irvin from Eat the Love.  At the time I printed the recipe I had no idea that he was the author.  I was captivated by the photography and the fact that the recipe was naturally gluten free.  

I did not see any need to adapt his recipe, other than I did not have apricots on hand, so I used dried currants.  My method of preparing the ingredients is a bit different from Irvin's and I will share that below but please go visit his site and see how lovely his cookies turned out.

The joy that my mouth experienced after the first bite is almost indescribable.  The only way I can explain the fusion of this cookie is a soft, chewy inside similar to a macaroon; the pillowy, crispy exterior that is fragile to the touch and yet sturdy to the bite. 

 BLISS is what comes to mind, in fact, that bliss cost me about 15 cookies  the first day.  

If you are a fan of macaroons, almonds and totally addicting cookies, then I suggest you give these a try. 

 Simply wonderful and divinely gourmet is the true essence of this cookie from Italy.

Recipe:  Currant Amaretti Cookies
Adapted from Eat the Love

3 cups of almond meal, purchased from Trader Joe's
1 cup of sugar
1/2 cup of confectioner's sugar
1 teaspoon of vanilla extract
1 teaspoon of almond extract
3 egg whites, at room temperature
1/2 cup dried currants, purchased from Whole Foods

Coating the cookies:

1/2 cup white sugar
1/2 cup confectioner's sugar

Preheat oven to 300 degrees.

Note: I used almond meal and did not need the meal to be any finer than what I had purchased it as.

Combine the almond meal, sugar and confectioners sugar in a bowl attached to your table mixer with the paddle attachment. 

 Add the vanilla and almond extract.  Combine until mixed.

Add one egg white at a time and COMPLETELY mix in each egg to the flour/extract.  The dough will start to form.

Gently fold in currants. 

With two small bowls, fill each one with the two different sugars. This combination of the two sugars creates that wonderful exterior of the cookie that makes it so unique.

The dough is thick.  I was able to use a cookie scoop and scoop the dough and drop each one into the white sugar.  Using your hands roll the ball first in the white sugar and then in the confectioner's sugar.  

See image below. They will gently spread a bit and then spread more when baked.

Bake for 24-28 minutes for a soft, chewy cookie and a bit longer for the crispier version.

The recipe will make 3-4 dozen, depending on size of cookie scoop. I used a tablespoon scoop so I got the smaller number.


Written by Sherron Watson


Monday, December 10, 2012

Chicken and Mushroom Alfredo


I love the combination of chicken and mushrooms together.  When you add a rich creamy sauce and some noodles you have a wonderful bowl of comfort food.

I don't use canned cream of anything soups.

WHY?

They are all usually made with wheat and other products that I don't care to feed my family.  When I need a cream base for soups or casseroles I start with three ingredients: butter, rice flour and milk or cream.

This gives me a rich thick white cream sauce to start my recipe with. Kind of like a blank canvas that a painter may use to start their drawings.

Once this is made, then I will add flavor to make the cream sauce go with my entree.  I add this flavor with cheese, fresh herbs, spices and veggies.

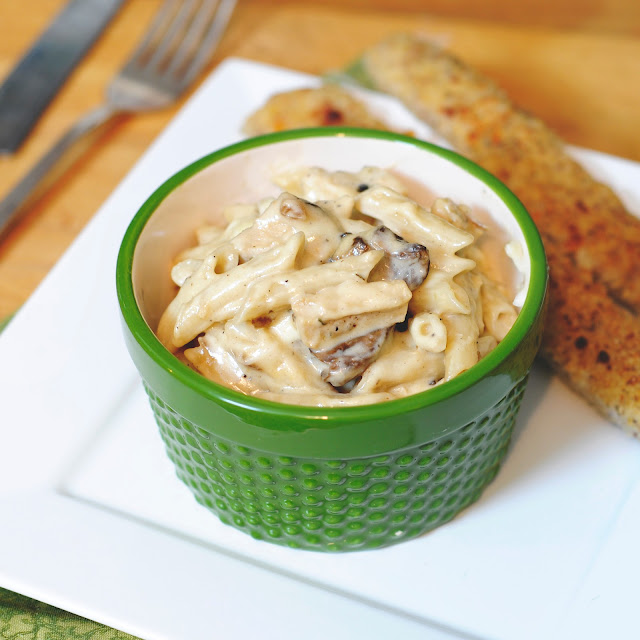
For this dish, I used parmesan cheese, minced garlic and sauteed mushrooms to add the flavor boost. When combined with the noodles and chicken you get a warm creamy alfredo style pasta dish.

The meat that you are adding to a creamy dish can also help add flavor.  A chicken breast can be seasoned with garlic salt, onion powder, dried herbs, salt and pepper then sauteed in olive oil for  added depth to the entree.

I built the flavors for this easy casserole  with the sauce, the sauteed mushrooms, onion and garlic and then the sauteed chicken breast.

When they all came together into the casserole it was a pleasant blend of texture and taste.

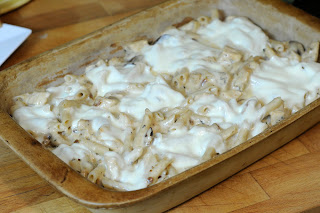
I have made this dish in a 9X13 casserole pan as well as in individual ramekins.

I also used gluten free noodles to make my                                                 casserole.  Regular wheat noodles can be used too.

Cooking from scratch does not have to be hard once you learn a few basics recipes.  Having a red and white sauce in your repertoire of recipes is a great place to start so that you can start saving money by not buying the expensive cans, and also by sharing with your family, food made with real ingredients.

Recipe:  Chicken and Mushroom Alfredo

4 cups of chicken, sliced or diced into small pieces
2 cups of fresh mushrooms, sliced
1/2 red onion, diced
1 teaspoon of garlic, minced
olive oil to saute
1/2 cup of butter (1 stick)
1/4-1/3 cup of brown rice flour (the more you use the thicker the sauce will be)
2 cups of cream (I have also used 1 cup of milk and 1 cup of cream)
1/3 cup grated parmesan cheese
dash of salt1 box of penne pasta, cooked and drained
fresh mozzarella cheese to top casserole with.

Preheat oven to 350.

Prepare noodles according to the directions on the box.  When cooked, drain and set aside.

In a saute pan, add chicken and a splash of olive oil.  You can use salt, pepper, garlic salt and onion powder to add flavor to the chicken breast.  I don't measure I just start shaking and eyeballing it.

Cook meat until no longer pink.  Remove pieces to a bowl.

Return pan to oven and a splash more oil and add mushrooms, onions and garlic.  Saute until mushrooms are soft.  (3-5 minutes)

In a pot on the stove melt the butter, add the flour and stir.  Add the milk and bring to a boil, stirring so that the flour does not stick to the bottom of the pan.  Once thick, remove from heat and add parmesan cheese.  Stir to combine.

In a large bowl combine chicken, sauteed mushroom mixture, alfredo sauce and noodles.  Spread in a 9X13 pan or portion in small ramekins.

Place mozzarella over the top of casserole.  Bake for 10-15 minutes, enough time to melt the cheese and warm any ingredients that may have cooled while waiting for the other items to be done.

Remove from oven and serve.


Written by Sherron Watson


Friday, December 7, 2012

Shredded Chicken with Green Chili's


I have made this for a few years now and thought I had it on the blog.  I don't.

It's so easy and great for those days that you have a lot going on in your family.

This can be made the night before too and warmed up for an easy on-the-go dinner or lunch.

I had originally made it a few weeks ago to use in taco shells but I was too lazy to make and/or warm up the corn tortilla's.

Terrible, huh?

I get so tired around dinner time and especially on days that I am cooking for 6-8 hours that it's meals like this that I rely on once in a while.

On Sunday, I usually get all of the meat out of the freezer for the next 4-5 days.  Some things thaw faster in the fridge than others and those get used first.

It was these two chickens breast lucky day.

I threw them into the crock pot and then thought to myself, "now what?"  The next thing I saw was a can of diced green chili's and I immediately made this old stand by.

I love it because it is so versatile depending on how much time I have to prepare dinner and on how tired I am.

The meat can be used in taco's, on a salad, as a filling for enchilada's or by its self with all the fixings and a big bowl of Frito chips.

I like to eat mine with a scoop of sour cream, jack cheese and fresh avocado.


Recipe:  Shredded Chicken with Green Chili's

2 large chicken breast, thawed
1 (4oz) can of diced green chili's
1 teaspoon of salt
2 teaspoons of cumin
1 teaspoon of chili powder
1 tablespoon of minced garlic
1/2 a red onion, sliced
1 can of black beans, drained and rinsed (add towards the end)

Add the first 7 ingredients to the crock pot and cook on high for two hours.

Check chicken and shred.  If the chicken does not easily pull apart, then cook for another hour and check.

Add the can of black beans and stir.  If you add the black beans in the beginning they may not hold their shape.

Once chicken shreds easily your chicken is done.

Serve or save in the refrigerator for a later use.


Wednesday, December 5, 2012

Chocolate Caramel Coconut Cookies

My cat had to get in on the action…LOL
Eating gluten free has it's ups and downs. This is one of the ups.

Finding a delicious cookie recipe that almost taste better than the original is awesome!

I try to find basic recipes that I used to make and then use the new version in my baking of treats and goodies.  This is one of those recipes that I know will be used over the rest of my life time.

Everyone needs a basic brownie, cake, bread and cookie recipe in their collection.  I found this recipe by Elizabeth Barbone on her site, Gluten Free Baking.  If you click on her page you will find the shortbread/sugar cookie recipe.

With using basics or simple recipes great things, like these cookies, can be created.


I used the left over coconut oil caramel that I had in my fridge for the gooey portion of this cookie.

I experimented with having the cookie bottom dipped in chocolate and without the extra layer.  We liked it better without the cookie bottom covered in chocolate.

I used toasted raw coconut for the sprinkles.  You could use sweetened coconut and have a much stronger flavor than we did.

To finish off the cookie, I melted a few chocolate chips and zigzagged them across the top.

I had someone tell me these did not look simple.  I laughed.  Simple is relative like everything else.  To me these were a piece of cake (well, a cookie actually) because I already had the caramel and the cookies made.  It took just a few minutes to throw them together.

Your neighbor and family members will think you visited a fancy bakery after you deliver a batch of these to their doorsteps.

ENJOY!

Recipe:  Chocolate Caramel Coconut Cookies

1 batch of sugar cookie dough (follow link above for gluten free or make your own)
1 jar of caramel sauce or make this one HERE
1/2 cup of toasted coconut
1 cup of melted chocolate chips

Bake cookies according to directions. Let cool.

Warm caramel sauce and spread over the top of each cookie.

Sprinkle caramel with toasted coconut.

Zig zag milk chocolate on top of cookie.

Let everything set and serve when ready.

To Toast Coconut:  In a large skillet over medium heat add raw coconut and stir.  In about 3-5 minutes the coconut will start to turn color and eventually become darker.  Be careful to not over toast the coconut.  Once it starts to brown it goes fast.  Stir it to keep it from burning.

To melt chocolate chips:  In a microwave proof bowl place chips.  Microwave for 30 seconds, stir and do it again until they are melted.


Written by Sherron Watson

Donut Breakfast Casserole

--------------------------------------------------------------------------------------------------------------- 1.  Share  this pos...

Popular Posts