Showing posts with label Pasta. Show all posts

Monday, December 10, 2012

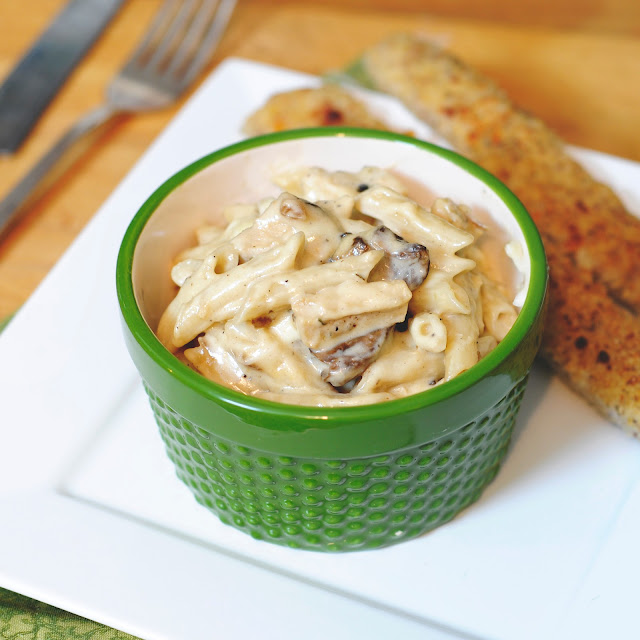
Chicken and Mushroom Alfredo


I love the combination of chicken and mushrooms together.  When you add a rich creamy sauce and some noodles you have a wonderful bowl of comfort food.

I don't use canned cream of anything soups.

WHY?

They are all usually made with wheat and other products that I don't care to feed my family.  When I need a cream base for soups or casseroles I start with three ingredients: butter, rice flour and milk or cream.

This gives me a rich thick white cream sauce to start my recipe with. Kind of like a blank canvas that a painter may use to start their drawings.

Once this is made, then I will add flavor to make the cream sauce go with my entree.  I add this flavor with cheese, fresh herbs, spices and veggies.

For this dish, I used parmesan cheese, minced garlic and sauteed mushrooms to add the flavor boost. When combined with the noodles and chicken you get a warm creamy alfredo style pasta dish.

The meat that you are adding to a creamy dish can also help add flavor.  A chicken breast can be seasoned with garlic salt, onion powder, dried herbs, salt and pepper then sauteed in olive oil for  added depth to the entree.

I built the flavors for this easy casserole  with the sauce, the sauteed mushrooms, onion and garlic and then the sauteed chicken breast.

When they all came together into the casserole it was a pleasant blend of texture and taste.

I have made this dish in a 9X13 casserole pan as well as in individual ramekins.

I also used gluten free noodles to make my                                                 casserole.  Regular wheat noodles can be used too.

Cooking from scratch does not have to be hard once you learn a few basics recipes.  Having a red and white sauce in your repertoire of recipes is a great place to start so that you can start saving money by not buying the expensive cans, and also by sharing with your family, food made with real ingredients.

Recipe:  Chicken and Mushroom Alfredo

4 cups of chicken, sliced or diced into small pieces
2 cups of fresh mushrooms, sliced
1/2 red onion, diced
1 teaspoon of garlic, minced
olive oil to saute
1/2 cup of butter (1 stick)
1/4-1/3 cup of brown rice flour (the more you use the thicker the sauce will be)
2 cups of cream (I have also used 1 cup of milk and 1 cup of cream)
1/3 cup grated parmesan cheese
dash of salt1 box of penne pasta, cooked and drained
fresh mozzarella cheese to top casserole with.

Preheat oven to 350.

Prepare noodles according to the directions on the box.  When cooked, drain and set aside.
In a saute pan, add chicken and a splash of olive oil.  You can use salt, pepper, garlic salt and onion powder to add flavor to the chicken breast.  I don't measure I just start shaking and eyeballing it.

Cook meat until no longer pink.  Remove pieces to a bowl.

Return pan to oven and a splash more oil and add mushrooms, onions and garlic.  Saute until mushrooms are soft.  (3-5 minutes)

In a pot on the stove melt the butter, add the flour and stir.  Add the milk and bring to a boil, stirring so that the flour does not stick to the bottom of the pan.  Once thick, remove from heat and add parmesan cheese.  Stir to combine.

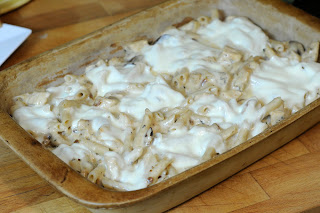
In a large bowl combine chicken, sauteed mushroom mixture, alfredo sauce and noodles.  Spread in a 9X13 pan or portion in small ramekins.

Place mozzarella over the top of casserole.  Bake for 10-15 minutes, enough time to melt the cheese and warm any ingredients that may have cooled while waiting for the other items to be done.

Remove from oven and serve.


Written by Sherron Watson


Wednesday, November 7, 2012

Chicken Florentine, Individual Portions


 I found these cute little ramekins at Target right before Halloween. I had planned on using them for a recipe to be featured in the magazine I write for but totally forgot about them.

This would and will not be the first time I forget about a prop that I have purchased…LOL

My house is full of odd plates, bowls and silverware.  Nothing really matches and I rarely have more than two of any one thing.

It's a bit eclectic come dinner time.  I try to stick to basic white when it comes time to buy sets of bowls and plates in large numbers.  This makes the addition of all of my little mismatched dishes work in perfect harmony.

I have made this recipe before from the 2009 edition of Cooks Country magazine and it turns out great every time.

I decided I would make it again but do them in the ramekins.  It worked great and made cleanup so much easier.  Leftovers were a piece of cake.  All I did was cover them up with Saran Wrap and refrigerate. The kids could microwave the leftovers without any issues.

I served mine in the ramekin with a salad on the side of a large plate.  For the purpose of pictures and so that you could easily see the combination of chicken, spinach and sauce, I spread it out on a plate below.


When you finally add the ramekins to be broiled, remember that everything is already cooked.  All you are doing when you add it to the oven is melting the cheese.  The reason this is important to know is because you are working with a cream based sauce and over cooking it can cause it to break down and get runny.  It still taste really good, just not as creamy.

There are lots of recipes that can be made into individualized portions.  Some of my favorites are lasagna, shepherds pie and eggplant parmesan.

Do you have a delicious dish that you like to make in single portions?  If so, leave a comment below and share. I am always looking for new ideas of great recipes.

Recipe: Chicken Florentine
Makes 8 individual sized portions

2 tablespoons olive oil
8 cups of fresh spinach, washed and dry
4 cups of cooked chicken, cubed
1/4 cup of onion, finely diced
2 garlic cloves, minced
1 1/4 cups chicken broth
1 1/4 cups of water
1 cup of heavy cream
6 tablespoons of grated parmesan cheese
1 teaspoon of grated lemon zest
1 teaspoon of lemon juice

Use a cookie sheet to line your 8 ramekins together. This makes it easier to transfer in and out of the oven.

In the bottom of each ramekin, add chicken.  See photo.


In a large sauce pan, heat olive oil and add spinach.  Toss for 2-3 minutes until wilted.  Add the spinach to the ramekins on top of the chicken.  See photo.


In a saucepan, a bit more olive oil and saute onion and garlic.  Add broth, cream and water.  Bring to a boil.  Reduce heat and simmer 10 minutes.  Sauce should start to get thicker the longer it has simmered. Ideally you want about one cup of reduced broth/water/cream sauce.

Remove from heat once desired thickness has been reached and stir in 4 tablespoons of grated parmesan cheese, lemon zest and juice.

Add the sauce to the top of each ramekin, over the spinach.

Add the remaining Parmesan Cheese to each cup.


Turn oven to broil.  Add cookie sheet with ramekins and broil for 3 minutes or until cheese is melted.

Serve immediately or pour onto plates and serve.


Monday, November 5, 2012

224. Greek Lasagna (Pastitsio)


I honestly do not remember last year being this cold.  I am freezing and we are only in the early months of a long and cold winter it would seem.

I have been craving casseroles; this one in particular, Greek Lasagna.  I call it a casserole because it is basically an all-in-one type of meal.

I love the layers, the meat sauce and the béchamel sauce on top.  Together the combination is out of this world.

Don't be put off by the cinnamon in the meat, it really gives this dish a unique and yet familiar flavoring.

As with all of my pasta dishes, I use gluten free choices.  My favorite are those made with rice. I don't like the flavor of the corn or the texture.

I had a bit of béchamel sauce left over and so the next day I tossed it together with some noodles, baked it and boy did my kids scarf that quick meal up.

Let me know how you like this dish if you try it at home.  There are variations of this all over the internet, let me know if your recipe is a bit different too. I am always up to trying something new.

ENJOY!

Recipe:  Greek Lasagna

One box of elbow pasta, cooked according to directions and drained (I used gluten free noodles)
Meat Sauce (recipe below)
Bechamel Sauce (recipe below)

Meat Sauce

1 tablespoon of olive oil
1 small onion, chopped fine
3 tablespoons of tomato sauce (you can use paste, I just did not want to waste the rest of the can)
6 cloves of garlic, minced
2 teaspoons dried oregano
2 teaspoons of ground cinnamon
1 1/2 pounds of lean ground beef
1/2 cup red wine
1 (15oz) can of tomato sauce ( I used my 3 tablespoons above out of this can)
1/2 cup of parmesan cheese ( you can use Romano cheese too)

Bechamel Sauce

5 tablespoons of butter
1/2 cup of flour (use brown rice flour for a gluten free version)
3 cloves of minced garlic
3 cups of 2% milk
2 cups of heavy cream
1 1/2 cups of grated Romano Cheese
3 large eggs
1/3 cup of plain Greek yogurt

Preheat oven to 425 degrees.

In a large saute pan, heat olive oil.  Add onions and cook until soft.  Add 3 tablespoons of tomato sauce, garlic, oregano and cinnamon.  Cook until mixture starts to darken.  Add ground beef.  Cook until meat is no longer pink.  Add wine.  Let simmer until wine has reduced to about 1 tablespoon.  Add tomato sauce and simmer until thick.  This will take about 10 minutes.  Stir in romano cheese; salt and pepper to taste.

Remove meat from heat and set aside.

In a separate pan melt the butter for the béchamel sauce. Add flour and stir to combine.  Stir in milk and cream; bring to a boil.  Reduce heat to medium so this can reduce down to about 4 cups.  Time will vary, but plan on about 15 minutes for this to happen.  Remove from heat once thickened and reduced, add 1 cup of the Romano cheese and stir until smooth.

Using a 9X13 baking dish, add prepared noodles and 2 cups of béchamel sauce; stir and smooth out in bottom of pan.

With the remaining 2 cups of béchamel sauce you will need to add the eggs and yogurt.  This step is delicate because you don't want to scramble the eggs.   In a small bowl, beat the 3 eggs.  Slowly add 1 cup of the béchamel sauce to the eggs, then take the béchamel/egg mixture and add it to the last cup of béchamel sauce.  Stir in yogurt.

Take the above remaining sauce and spread over the top of the meat.  Sprinkle the last 1/2 cup of Romano cheese on top.

Bake 35 minutes.  Let sit for 10 before serving.


Wednesday, August 22, 2012

Drunkin Noodles (Wide Rice Noodles)


Update:  9-19-2013.  The noodles that I have used for this recipe seem to contain wheat starch.  I was asked this by a reader and reached out to the manufacturer and he replied with this response:

Dear Sherron,
The rice sheet contains wheat starch, so it cannot be qualified as gluten free as wheat starch may contain trace amount of wheat protein (gluten).

This is a problem if you need this dish to be gluten free.  As a substitute you can use gf noodles, but you will lose the "wide noodle" look and texture.  If I find something that can be used for my gf followers I will definitely let you know.  Thanks!

----------------------------------------------------------------------------------------------------------------------------------

I have been looking for these noodles for 20+ years.  I have googled every recipe that I can find on how to make your own wide rice noodles.  To be honest, it looks difficult.

I am not one to back away from a challenge and especially a food challenge, but I do believe that some things are just better left to the professionals.

I have moved numerous times and been in many Asian Markets.  I have looked through stacks of noodle packaging, often times not really knowing what I was reading or looking at.  The languages on the packages are from China, Korea and Japan….I don't speak any of these and can barely recognize the differences in the kanji's.  Throughout this search, I have discovered many other flavors and foods to test and try in the kitchen.

I stumbled upon a post, yes it was "how to make wide rice noodles" and there I discovered something.  You can BUY these noodles in the store.  I had to beg to differ.  I had been in stores and I could not find a wide rice noodle anywhere….It turns out, they are not sold as wide noodles, but sheets of rice pasta and they were sold in the refrigerator section.

Here they were, this whole time, tucked between the miso soups and tofus of the world.  All lined up in a row with their distinct languages printed across the packaging and without a single word saying "wide rice noodles".

Honestly, if I had not stumbled upon this post, I would never have found them and I am so glad that I did.

I make this dish similar to my other Asian influenced stir fry's.  I try to use the basic sauce recipe and change the veggies and meat around a bit.  For me, the noodle makes the dish.

While eating the meat and veggies can be reminiscent of  Pad Woon Sen, the noodle is not.  It has a smooth and slippery feel to it.  When this is combined with the crunch of al dante veggies and chicken or beef…you mouth sings!  OK, maybe that is just my mouth..LOL

I am trying to tell you it is delicious, different and definitely a family hit at our home.

I have included more pictures with this post because I want you to have something to reference when you go to the store.   The noodles can only be purchased at an Asian store or possibly on line and sent to you.

This is the brand that I use and a quick tutorial on how to prepare the noodles : see below.


Preparing the noodles is an easy process.  Puncture a whole in the bag and microwave for a minute.  The noodles should be soft and pliable when they are warm.  Once the noodles are soft, then you can unwrap the noodle sheets and cut them into WIDE noodles…FINALLY, I have wide rice noodles.


You may notice that some of the noodle sheet is still hard and this is okay.  I have still been able to cut and use them in my dish.  The noodles are stuck together and you will need to peel them apart.  Peeled apart they will be very thin and LONG.  I usually cut the noodle strips into 5-6 inch pieces.


Once the noodles are cut into strips and unstuck from each other, you are ready to use them.  I use them in a dish called Drunkin' Noodles, this is a favorite with my hubby when we go out to eat.

Recipe:  Drunkin' Noodles using Wide Rice Noodles

2 cups of cooked meat: chicken, beef or pork
1 small head of cabbage, diced into 1X1 inch squares
1 small red onion, diced
2 carrots, sliced
1 T. minced garlic
oil, vegetable
oil, sesame

Sauce:

1/4 cup of dark soy sauce, omit for gluten allergies and substitute the gluten free version
1/4 cup of soy sauce, use a gluten free version if need be
1 teaspoon fish sauce, use more if you want a bolder flavor

I have included a picture of the brands that I use with the sauce, I thought it would be easier.
Combine the three into a small bowl and set aside.


Prepare all of the veggies according to the recommended style: diced, sliced, cubed…etc.  I use napa cabbage for this dish and it does provide a lot more than a normal head of cabbage.  I cut off the bottom 4 inches.  I personally do not like this part of the cabbage and you might be able to add it to soup stock.


In a large pan or wok, add the oils.  I use a vegetable oil, that I add some sesame oil to.  This adds a nice flavor to the dish.  You can use just sesame oil but it makes the dish taste very "sesame".  Add the garlic and saute for 2 minutes.


Add the remaining veggies.  You may need to do this in two batches.  Just add a bit more oil and toss them together in the end.  The veggies will reduce.


Add the noodles (directions for preparation are on the back of the packaging or see above).


Add the sauce.  Toss and cook for 3-5 minutes.  The noodles will turn the color of the sauce.


Tuesday, August 14, 2012

Cellophane Noodle Stir Fry


One of our favorite places to eat in Annapolis is a restaurant named Lemon Grass.  All their food is excellent.

What is amazing to me is the size of the restaurant.  It is very small with a few tables inside and a few tables outside.  In the summer we usually don't have any problems getting a seat but come winter..you better be prepared for a wait and it's a packed wait.  There is maybe a 4X6 foot spot when you first walk in to wait.

I love it because it's a great chance to meet new people.  The tables are very close together and you may even get a  chance to say hello to more new friends…LOL

My favorite dish is the fried duck.  I can't for the life of me figure out how they get the duck slices so crispy.  I have been asked by several friends what I think their secret is and I can't find anything that would give a hint as to what they do.  I know of a friend who knows the owners and even he can't get the "recipe"…LOL

While my mom and sister were in town a few months ago we took them to Lemon Grass.  They had to agree the food was excellent.  My sister always orders this one dish named Pad Woon Sen.  She asked me to come close to reproducing it for her so that she could make it at home.

It wasn't too hard to make because this is a dish that we make a lot, not ever realizing it had a fancy name.

I use a simple sauce of three ingredients.  This sauce I use on most of my asian noodle dishes.  I know that some recipes will call for hoisin sauce or plum sauce.  I personally find these sauces to be too sweet.  I want to taste the noodles, veggie and meat more than the sweet sauces used by some.

Another new favorite I have discovered is Pork Belly.  When we go into our Asian market, they sell it by the pounds.  I could never figure out what it was used for, until now.

I bought some and did some researching in trying to figure out how I prepared the meat.  I found that you cook it similar to a pork chop.  I will tell you how I prepare the pork belly below in the recipe.  You can always use chicken or beef in this recipe.  I just enjoy pork belly, way too much!!!  LOL

I think this recipe fits right into our Simply Gourmet way of eating.  We use wheat free noodles, lots of veggies, a little bit of meat and a few sauces.  It's fresh, beautiful and sure to be enjoyed by the whole family.

This recipe was featured over at Amee's Savory Dish for her Fit and Fabulous Friday feature.  You can see the other links here.

Recipe:  Cellophane (Glass) Noodle Stir Fry

1/2 pound of pork belly, prepared…see below
1  small head of green cabbage, diced into 1x1 inch squares
1/2 red onion, sliced
1/2 red bell pepper, diced
1 teaspoon minced garlic
1 tablespoon sesame oil
1 packages of cellophane noodles, prepared according to package
2 tablespoons dark soy sauce
2 tablespoons of soy sauce
1/2 teaspoon of fish sauce (use this sparingly at first)
peanuts to garnish
Cilantro to garnish

NOTE:  There are other things that can be added to the recipe: scrambled eggs, mushrooms, bean sprouts, shrimp, chicken, etc.

To prepare the pork belly I use a cast iron pan.  Preheat oven to 350. Score the pork belly across the top of the fatty side every inch.  Heat 1 tablespoon of oil in pan and add pork belly.  I cook the pork belly until crispy on all sides. Place cast iron pan with seared pork belly into oven to finish cooking.  Cook for 15 minutes until it is no longer pink on the inside. This is the amount of time it should take you to prepare the noodles and veggies.

Prepare your noodles according to the package.

In a saute pan, add sesame oil.  Add your veggies and saute until they are cooked to your liking.  We like our veggies to be al dente, still a little bite to them.

Drain your noodles and add them to the veggies.

Add the dark soy sauce, soy sauce and fish sauce.

Remove pork belly from the stove and slice into bit size pieces, add them to the veggie and noodles.

The noodles can be pretty hard to stir into the dish because they are so long.  I will take a fork and pull the noodles up and cut them with a pair of kitchen scissors.  It makes the dish easier to serve and to eat.

I like to add peanuts and cilantro to my Thai dishes, but it's up to you and your guest.


For cooking pictures, see below:

Pork Belly, cut and ready to add to the noodles and veggies.


Veggies before they are sauteed.

Veggies and Pork Belly awaiting the noodles.
Noodles.

Noodles, veggies and pork belly with sauce.  YUM


Thursday, January 19, 2012

Homemade Pasta and Ravioli's


I have wanted a pasta machine for years…a long time…forever!  I finally got one for Christmas and it sat in its box for almost a month.  I have been waiting for the right time to "break it in".  I was so busy during the holidays with the blog that I found I was a little bit burned out that first week of January.
I find that I need time off from the blog on occasion.   It gives me a chance to reload, recharge and review what I have done, want to do and will ,without question, attempt over the next few months.

My new toy.

Pasta, that is a glorious word in our home!  We love it almost as much as we like rice.  I have a fantastic recipe for gluten free pasta that I use all the time.  It's easy because there is no kneading..NONE.  The one draw back that I find with it, is,  the recipe uses all starches.  I find these to have very little nutritional value and cringe some times if we eat it too much.  I have slowly been adding gluten back into my diet.  VERY SLOWLY.   If I make something from scratch, I have little to no problems, but if I eat some thing that is store bought or in a box it messes with my system.  I can't figure it out.  So I avoid it and feel much better.

My family would eat pasta daily if I was diligent in producing the dough every day.  I would probably have really nice biceps and nothing "swinging" (If, your over 40 you might know what I am referring too…LOLOL)  

Isabella could not wait to get her hands on the pasta roller.  I had to help her change the widths but other than that she did just fin.


Sunday, I was feeling refreshed and got the goods out of their boxes.  It was red, my favorite color.  Shiny, so beautiful.  I immediately told my oldest daughter that, down the road, she will probably inherit the pasta roller and it could be in our family for years.  It made me smile.  I was determined to use it often so that I could instill in the pasta roller a sense of use, love and family tradition.  

Isabella made her own spaghetti…she was so happy.  A trick I learned when using the small spaghetti maker, is let the sheet of pasta dry for a few minutes.  The strands of spaghetti will be perfect.

I started the dough like all pasta makers do…flour with a well in the middle filled with egg.  I can't tell you how I felt to watch the transformation that the dough goes through as it transorms from a stiff, hard to handle mix to this smooth and silky bundle of yumminess.  Just when you think you can't knead for another minute…it changes right before your eyes.  You become one, you don't want to stop, you smile.  SUCCESS!


The recipe for the dough is just a standard flour/egg mixture that I have used in the past.  I got it from a friend.  The ravioli filling is made up of what I have on hand.  It's never the same.  Tonight I had spinach and zucchini, always a wonderful combination in my opinion.  
I can't wait to get another batch of pasta whipped up so that I can experiment with other types of noodles, sheet pasta and filled shapes.  Oh, the options are limitless.

Recipe: Pasta (filling ingredients listed below)

3 cups of flour
4 large eggs
1 tsp salt
3 T. water (possibly more depending on dough)

Mix the salt and flour together and dump on your table.  Make a well in center of the flour and add your eggs and 3T. water.  With a fork, start mixing the eggs into the flour.  I also like to have a metal pastry scrapper so that with one hand I am mixing and the other one I am keeping my flour from going all over the place.  Work the dough into a ball.

I will be honest and tell you I thought this was never going to work.  The dough is stiff and brittle.  I keep a bowl of water nearby.  As I start to knead the dough and if it feels too dry I wet my hands and go back to kneading.  I might do this 3 or 4 times.  The dough should not be dry.

Kneading time will be about 10 minutes.  Around 8 minutes into the kneading you will notice the dough  start to become softer and it will get more and more so as you get to the 10 minute mark.

After you have kneaded you dough, cut the ball into 4 sections.  I wrap each section in saran wrap and let it rest for 30 minutes.  Each wrapped section will make two sheets for the ravioli tray.


You will need to follow the directions for your specific pasta machine.  I do believe they are all pretty much the same but just to be sure, read your manual.

With the ravioli, you will need to take one of the four wrapped doughs and cut in half.  Set your machine to 0, the widest and roll your dough through 2 or 3 times.  Each time it comes out, fold it into thirds and re-roll.

At this point you can start changing the number to make the pasta roller thinner and thinner.  For the ravioli, I stopped at 7. (see pictures below)  Use your hand to guide the pasta into the machine and use your hands to help it stretch out.  The dough is very durable.  If it starts to stick in the machine or tear, then you may need to add a dusting of flour.


Recipe: Ravioli Filling

1/2 cup of Ricotta Cheese
1/4 cup of diced green onion
1 tsp minced garlic
1/3 cup of parmesan cheese, shredded
1 egg
1/3 cup of shredded zucchini (optional)
1 cup of spinach, cut coarsely (optional)
 1/4 tsp of pepper
1/2 tsp of salt
10 leaves of fresh Oregano or 1/2 tsp. or dried oregano (you can use any combination of your favorite spices)

Mix the filling ingredients together and use the required amount to fill your particular ravioli tray.  Mine happens to be a square tray with smaller raviolis.  The amount used will change with each type of tray.


I learned that with my tray, it helped to slightly dust the inside with flour.  The ravioli's pulled out much easier.  In a large pot you will want to bring 8-10 cups of water to a boil.  Add the ravioli's and cook for 4-6 minutes.

Serve immediately with your favorite sauce.

Thursday, September 15, 2011

Pad Thai


When I saw the Pad Thai from Bake Your Day, I just knew I had to make it.  We love Pad Thai and I have had a hard time finding a recipe that had the flavor we liked.  This one hit the spot. It was so good and delicious that we have eaten it at least once a week for a month now.  It's easy, tasty and my kids LOVE IT!  It also reheats very well the next day.

I snapped some pictures of our dish which you will notice is made with Chicken.  We have also made this with just a scrambled egg.  I can't wait to make it with the shrimp when the hubby is away for the weekend.  He does not like shrimp...boo hoo!

Recipe: Shrimp/Chicken Pad Thai 
adapted from Bake Your Day


8 ounces of rice noodles
2 Tbs. brown sugar
2 Tbs. soy sauce
2 tsp. oyster sauce
2 Tbs. fresh lemon juice
1 Tbs. Sriracha (more or less depending on your desired heat level)
1 tsp. freshly grated ginger
1/2 tsp. sesame oil
3 Tbs. canola oil
1 1/2 cups green onions, sliced into 1-inch pieces
4 cloves garlic, minced
2 Tbs. cilantro, divided
1.5 cups of cooked chicken
1 – 2 cups bean sprouts
1/4 cup dry roasted peanuts, unsalted


Cook noodles according to package.  Drain and drizzle with olive oil.

While the noodles cook, mix the brown sugar, soy sauce, oyster sauce, lemon juice, Sriracha in a small bowl and set aside.

Heat the oil in a large, high-sided skillet or wok.  Add onion, garlic, shrimp and 1 tablespoon cilantro; stir-fry until chicken is almost cooked.  Stir in sauce and cook one minute, stirring constantly. 

Add the cooked noodles and bean sprouts.  Garnish with peanuts and the remaining cilantro.


Written by Sherron Watson


Pin It

Thursday, August 11, 2011

Cheese Ravioli with Marinara Sauce


I have been wanting to make homemade ravioli for a very long time.  I kept thinking that I would buy a pasta machine, get the molds, and on and on and on.  I will someday have those things, but for right now I must do it by hand or the old fashion way. No molds and no pasta machine.  

I like getting my hands in the dough and playing in the flour.  This does take some time to prepare, but it is so worth the time and effort to make a good ravioli.  My family absolutely fell in love with these little morsels of heaven.  

I will be making this again and trying some different fillings.  I would love to try a combination of spinach, mushroom, and cheese.

I make a lot of food in my house but this is by far the best tasting pasta dish I have ever made.  I think it has a lot to do with fresh ingredients (herb and pasta), the homemade marinara and my love for cooking.  I have to admit it, making something like this makes me happy and I do feel like betty homemaker when I can whip up a ravioli dinner...LOL


Recipe:  Asiago Cheese Ravioli

If serving the ravioli with the marinara sauce.  Make this first, it is listed below.

You will need your favorite pasta dough. The filling listed below will make about 40-50 ravioli’s, depending on how large you make your squares and how full you stuff them.  If you need a recipe, The Pioneer Woman has an excellent step by step recipe that can be found here with pictures.  It is amazing! 

I use a gluten-free pasta dough that is wonderful and tastes amazing. I never have any problem with it and can roll it very thin.  That recipe can be found here.

2/3 cup of Ricotta Cheese
½ cup of shredded Asiago
1 T. garlic, minced ( we like a lot, so if this is too much, just reduce)
1 T. fresh Basil, chopped
1 tsp. olive oil
½ tsp. of salt

Mix all of the above ingredients together and set aside while you roll out your pasta dough.

Take a large pot and fill with water.  I would add about 10-12 cups of water.  I also add 1 tsp. of olive oil to the water.

For the dough:  I flour my work surface and rolling pin.  I cut my dough into small sections.  

You want equal sections so that you have a top and bottom piece to make your ravioli. Shape your dough like a rectangle (2 short ends/2 long sides).  I roll the dough out very thin.  I roll out the first one, pick it up and set it on a cookie sheet.  Roll out the second piece of dough. I use a cookie scoop to scoop my filling and space them apart on my second piece of dough.  I like my ravioli at about 2 X 2.  I can sometimes get three rows across, but usually just 2.  Once you have placed your filling, grab the first rolled out dough and lay it on top of the second.  I use my fingers and gently push the top down around the scoops. 

I don’t have a ravioli cutter (this is a round or square tool with a handle). I use my pizza cutter and cut the rows of filling into squares.  You will cut long ways and then cut across, forming individual squares or ravioli. You want dough around the ravioli so it does not fall out during boiling.

I have a cookie sheet lined with parchment ready for me to place each ravioli on.  When I pick up the ravioli, I like to pinch the edges to make sure they are sealed.  The pizza roller does not always seal them like a ravioli cutter will.  If they need to be sealed, I part the layers on the edges brush some water in between and pinch again.  I usually lose one or two fillings in the boiling process.


The ravioli will sink to the bottom of the boiling water and rise to the top.  I cook my ravioli’s for about 6-7 minutes.  I want the filling to be warm, the noodle cooked and the cheese starts to melt.  I transfer the ravioli to a large plate, sprinkle with cheese and serve with the marinara.


FOR GLUTEN-FREE DOUGH:  Use white rice flour when rolling out the dough.  Starch is too slippery and will change the color of your dough.

I served the ravioli with a homemade Marinara Sauce.

Recipe: Marinara Sauce

2 (14.5 oz) cans of diced tomatoes, with juice
1 T. fresh oregano
2 tsp. fresh thyme
1 tsp garlic salt
1/2 tsp onion powder
salt to taste
dash of pepper

Combine all ingredients into a small saucepan.  I have the heat set at medium. Once the marinara starts to bubble, turn the heat down to low.  I like for this to be simmering while I am making the ravioli.  I think the longer it simmers the more the flavors have a chance to meld.  I like the tomato chunks in my sauce, if you do not, then you can cut or mash the tomatoes so they are not so big.

Salt is a tricky thing with tomato sauces.  Some people like very little and others a lot.  I always start out with 1/2 tsp and do the: taste, add, taste, add..method.  It is a personal choice of how salty you like your food.  It's always easier to add more then it is to start over because you over-salted something.

Written by Sherron Watson

Donut Breakfast Casserole

--------------------------------------------------------------------------------------------------------------- 1.  Share  this pos...

Popular Posts